WooCommerce Table Rate Shipping
- created: 01/01/2013
- latest update: 11/01/2013
- by: Erica Dion
- email: erica@bolderelements.net
About this Plugin
Table Rate shipping allows the administrator to add a series of conditions to determine the shipping price for a customer's order. These rules can be set on a per order, per item, or per class basis.
The WooCommerce Table Rate Shipping plugin works alongside your WooCommerce store by adding a new shipping method directly to your WooCommerce settings. The familiar layout and easy to use options will make it simple to setup and use in your store.
This plugin is designed to work with the open-source WooCommerce plugin.
Minimum Requirements:
- PHP 4.3
- WordPress 3.3
- WooCommerce 1.6
- Javscript / jQuery
Installation
This plugin installs the same as any other WordPress plugin. For detailed instructions, please review the two options below:
Install by ZIP File
- From your WordPress dashboard, choose 'Add New' under the 'Plugins' category
- Select 'Upload' from the set of links at the top of the page (the second link)
- From here, browse for the zip file included in your plugin purchase titled 'woocommerce-table-rate-shipping.zip' and click the 'Install Now' button
- Once installation is complete, activate the plugin to enable its features.
Install by FTP
- Find the directoy titled 'woocommerce-table-rate-shipping' and upload it and all files within to the plugins directory of your WordPress install (/<i>WORDPRESS-DIRECTORY</i>/wp-content/plugins/)
- From your WordPress dashboard, choose 'Installed Plugins' under the 'Plugins' category
- Locate the newly added plugin and click on the 'Activate' link to enable its features.
Settings: Table Rates
The settings for Table Rate shipping can be found alongside the other shipping methods.
Dashboard: WooCommerce > Settings > Shipping > Table Rate
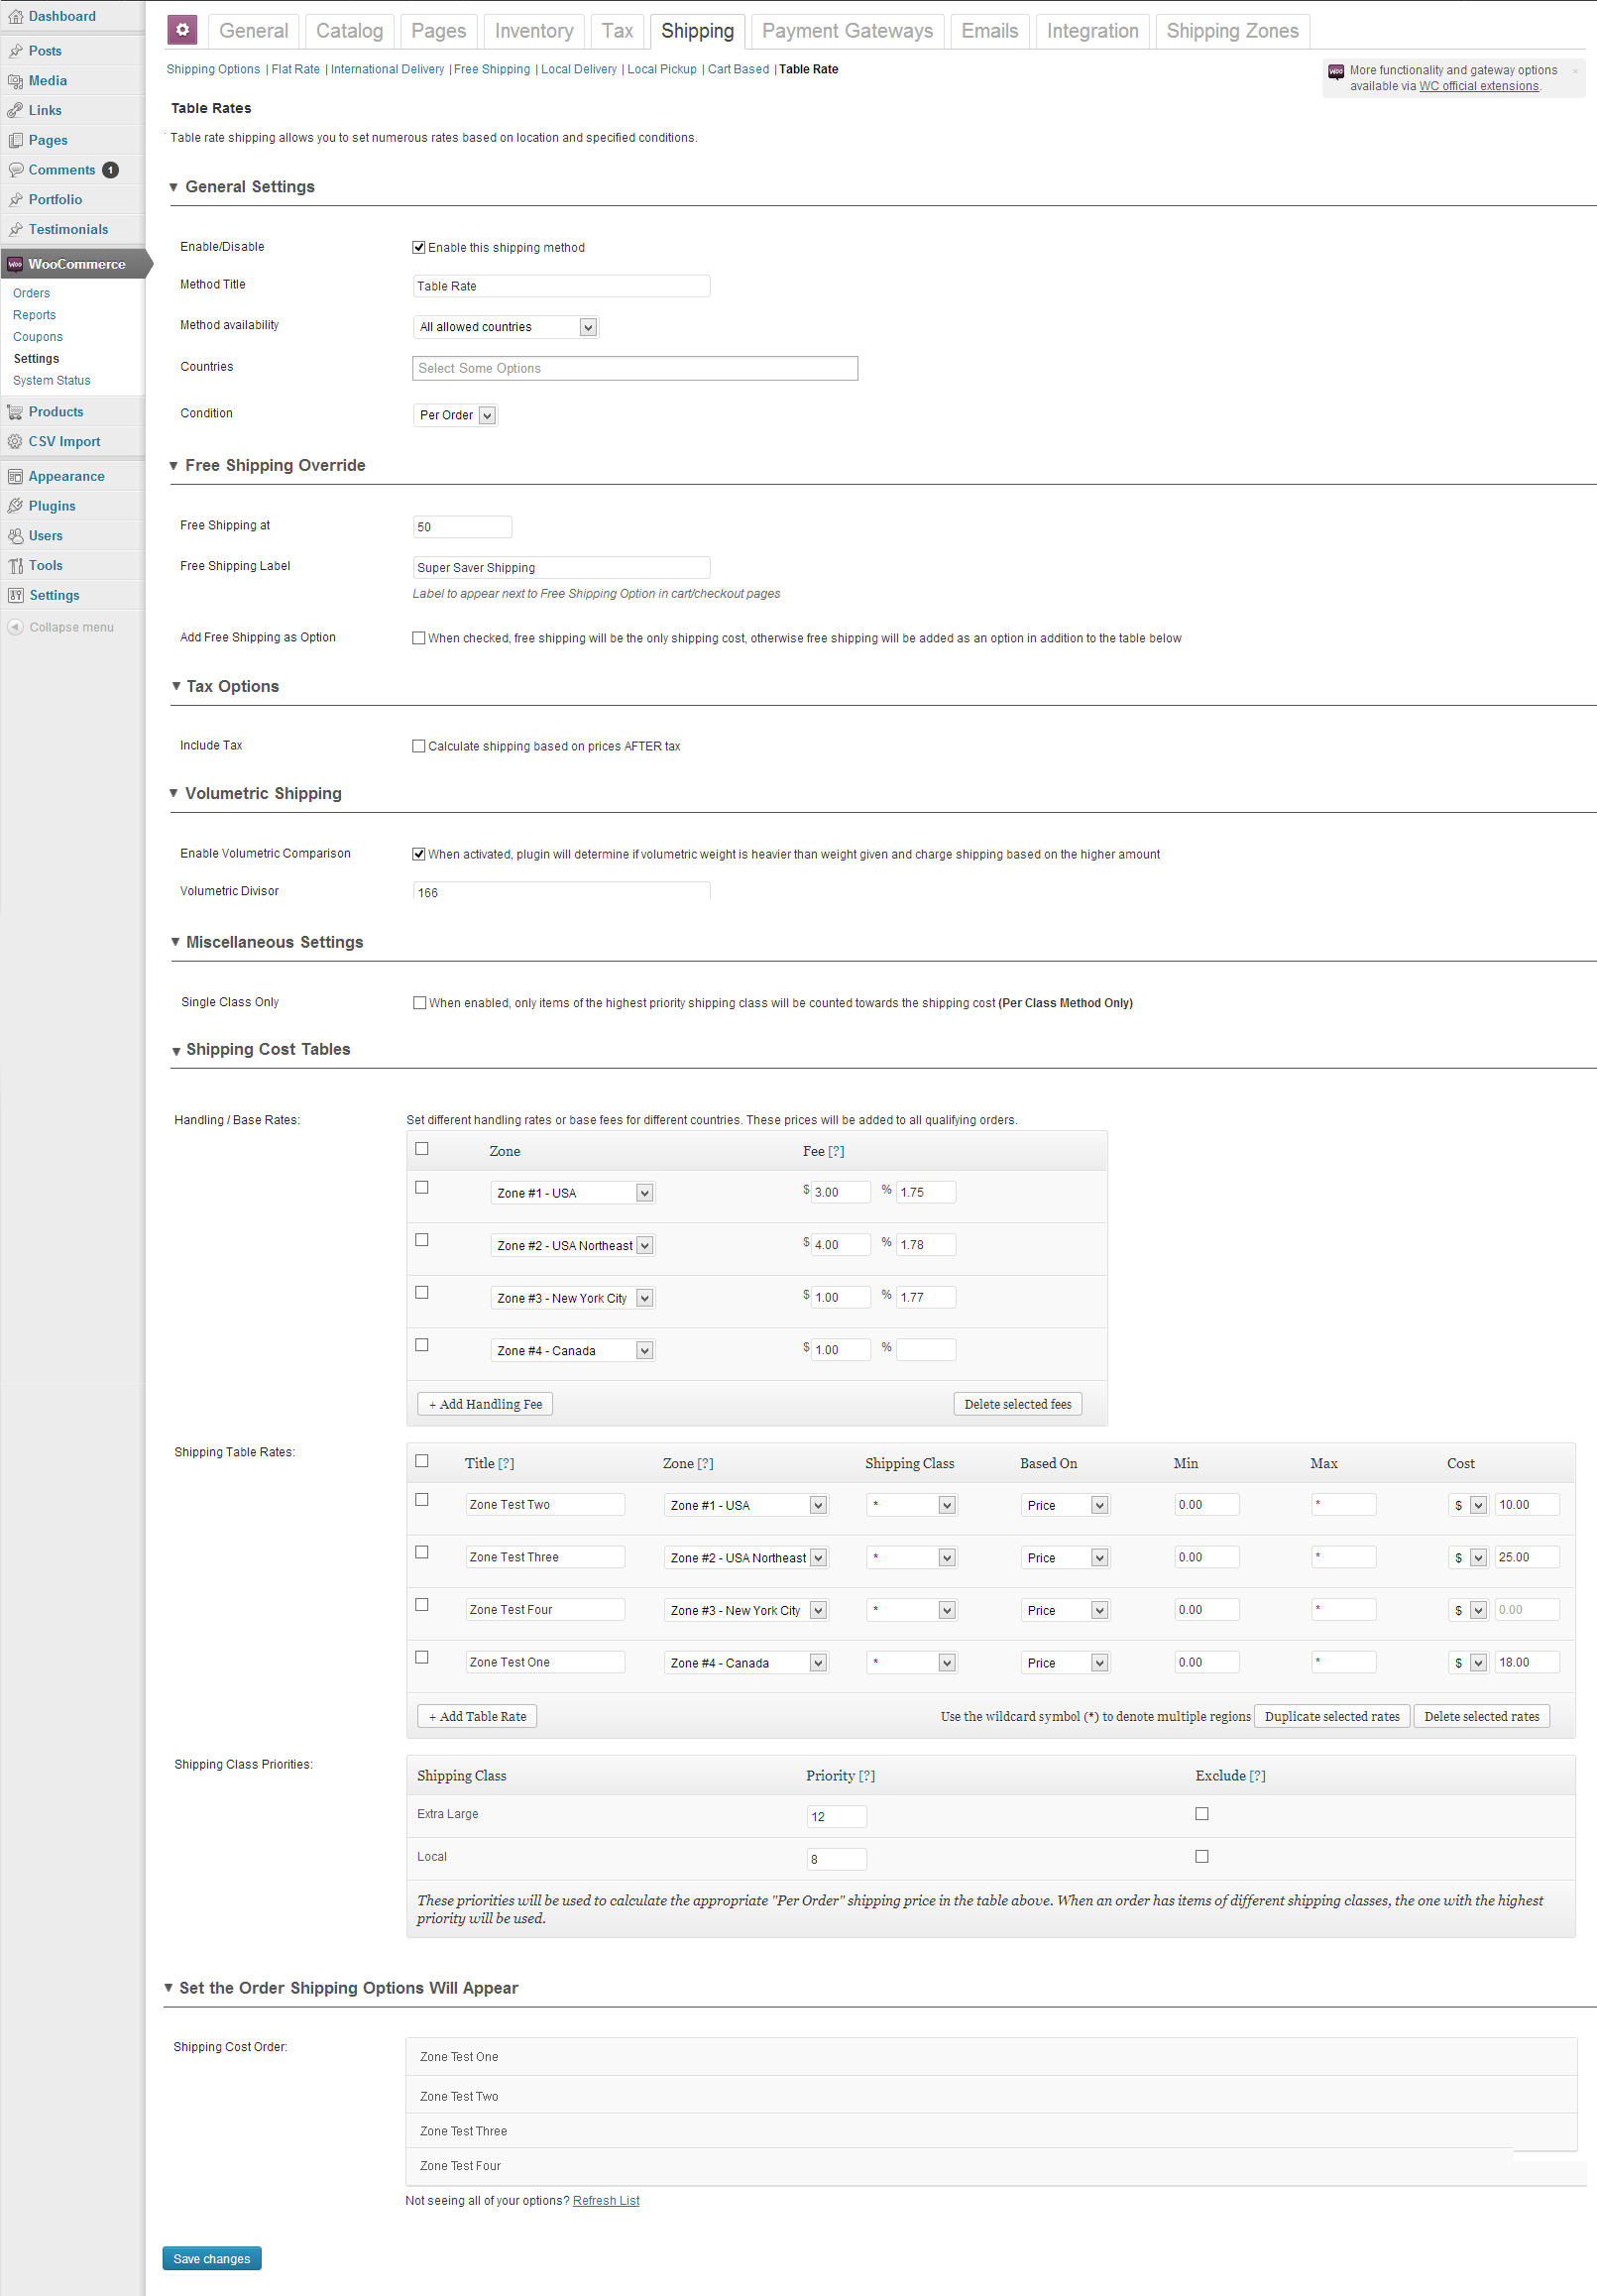
Enable / Disable - This controls whether or not the plugin will be active on the current website. When the checkbox is marked, the plugin is enabled and active. Unmarking the checkbox will disable functionality but keep your settings saved.
Method Title - This is the text that will be refered to in your settings panel. It will NOT change the appearance of the shipping method title in the cart or checkout process.
Method Availability - Choose which countries should be using this plugin to calculate their shipping. All Allowed Countries will include all countries specified in the General WooCommerce settings. Specific Countries will produce a new box and allow you to choose the only countries capable of using table rate shipping. Excluding selected countries will also produce a new box below and include all countries listed in the General WooCommerce settings EXCEPT those listed in the box.
Condition - This options determines how the shipping price is calculated. There are two options: Per Order and Per Item. Per order will calculate a single price based on the total information of the cart. Per Item will calculate the shipping price for each item and sum them up at the end.
Free Shipping At- This options determines how the shipping price is calculated. There are two options: Per Order and Per Item. Per order will calculate a single price based on the total information of the cart. Per Item will calculate the shipping price for each item and sum them up at the end.
Free Shipping Label- If you choose to have a free shipping option, you may choose to give it a unique name with this setting. If free shipping is enabled and a label is not specified, the Method Title from above will be used in its place.
Add Free Shipping as Option - If selected (and if free shipping is enabled), when a customer qualifies for free shipping, free will be their only option. Otherwise, Free Shipping will be left an option atop of the customer's qualifying rates from the table you define below.
Include Tax - When this checkbox is marked, shipping costs will be calculate on the price of the items in the cart AFTER tax has been added. Leave unmarked to not include tax in your shipping cost.
Enable Volumetric Comparison - Some delivery companies such as UPS and DHL offer something called volumetric shipping. This is an optional feature for this plugin and requires that dimensions be set for all products. When this checkbox is marked, a volumetric weight is calculated for each item and compared to the item's actual weight. Whichever number is larger will carry on as the item's official weight.
Volumetric Divisor - Each delivery company that offers volumetric support uses a special number to calculate its volumetric weight. This number is generally based on the unit of measurement the dimensions are in. Please contact your delivery carrier to determine the number you should use here.
Single Class Only - This settings is only applicable when using the Per Class method. When enabled, if a customer is purchasing items from multiple shipping classes, only the one with the highest priority will return a rate. The items from the other classes will be ignored.
Handling / Base Rates - This table allows you to set fee(s) that will be added to the shipping price after it is calculated. If left blank, no handling fee will be added.
Zone - Choose a specific zone for the given fee to be applied to.
Fee - There are two options for types of fees: a fixed price or a percentage. You can choose either of these or both if desired. If included, the percentage will be calculated and added first. It takes the given percentage of the cart subtotal and adds the result to the shipping cost. If a fixed priced is listed, this will also be added to the shipping cost in the end.
Shipping Table Rate - This table may seem a little overwhelming so let's break it down to each column. Odds are you won't need to worry about much of it, but it has many possiblities if you are looking for a more complex system.
Title - This is the text that will appear next to the shipping price in the cart and checkout sections.
Identifier - This is the text that the rate will be identified with. It differentiates the different methods that could be available to the buyer. For example: Ground, Priority, and Next Day Air. Shipping rates with different identifiers will be added as different options for the customer to choose from. Shipping rates with the same identifier will be either added or overwritten depending on your method chosen.
Zone - This is the first criteria the shipping method will check for. From here you will select the zone that this shipping method will apply to. Only customers in this region specified in the zone will have the possibility of choosing this shipping price. The drop down box is populated with all zones that are included in the Shipping Zones Settings tab.
Shipping Class - If you would like to specify certain rules for different classes, this option will help and work differently depending on the condition you're using. Per Order will look to see if the user's cart contains an item of this class. Not all items must belong in this class, but at least one must in order for this shipping price to apply. If you have the Per Item condition, only items under that particular shipping class will have the potential of being assigned this shipping price. Per class works similar to per item except it groups products by their class, and the applied the shipping rate to the entire group if a match is found. If you wish to include all shipping classes, simply leave it as an asterisk (*).
Based On - Select the comparison you wish to use for the next few options, min and max, of the table. There are four options: Price, Weight, Item Count, and Dimensions. If the customer's information has fit into the previous 3 conditions, this will be the final comparison.
Min - This is the minimum value for this shipping rate. If you chose Price in the previous option, this will compare the minimum value to the price of the item or cart depending on the Condition set earlier. It must be equal to or higher than the Min value. The same rule applies for both weight and item count. Set this value to zero to include all values less than the maximum, set in the next option.
Max - This is the maximum value for this shipping rate. If you chose to base the criteria on Price, this will compare the maximum value to the price of the item or cart depending on the Condition set earlier. It must be less than or equal to the Max value. The same rule applies for both weight and item count. Set this value to an asterisk (*) to include all values greater the the minimum, set in the previous option.
Cost - This is the set price for shipping. If the customer's shipping information has matched all of the criteria set in this table row, this rate will be added to their shipping options. There are four options for setting a rate: fixed amount, percentage, multiplier, and deny. The fixed amount will be the shipping cost for this cart, item, or class depending on condition, but if percentage (%) is selected, then the shipping cost will be the percentage of the cart subtotal, item subtotal, or class subtotal again depending on which condition is chosen. The multiplier option (x) is for Per Order and Per Class conditions only. When selected, the shipping cost will be multiplied by the quantity either in the cart or in the class group depending on the condition you have chosen. Next is the weight unit (w) which multiples the shipping cost given by the weight of the items in the cart. Finally, the deny option (D) removes a previous shipping cost from the list of possible rates. This would be helpful if an order qualifies for another shipping rate, but maybe it contains an item that you don't support shipping to their country for. This feature could remove the rate if the customer's information matches.
Bundle - This optional feature allows for you to change the price based on the quantity the customer is ordering. There are two fields: Quantity and Cost (respectively). If a quantity of more than 1 is specified, then the shipping cost supplied under the Cost column will be applied ONLY to items up until the quantity specified. Then all remaining items that qualify will be charged the second amount.
Default - If you are supplying multiple options for a customer to choose from, you have the option to select one as the default option the customer will see. It is recommended that all options with the selected title be checked to ensure it works properly.
Shipping Class Priorities - The third table on this settings page will manage the shipping classes you currently have. It's primary use is for the Per Order method.
Shipping Class - This text labels each shipping class previously set under Products > Shipping Classes.
Priority - The text boxes in this column are used for the Per Order condition. It sets which classes are of top priority, for example larger items would generally be a higher priority than smaller items. It will determine the size of the box needed to ship all items in the cart no matter how small the others are. Technically any whole number can be used here, but numbers small and close together are recommended. The higher the number the higher the priority, and respectfully the lower the number the lower the priority.
Exclude - This checkbox works for all conditions. When checked, any item under the specified shipping class will not count towards the calculation. In other words, its shipping is free.
Set the Order Shipping Options Will Appear - This final table simply lists the titles from all of your specified rates. They can then be dragged and placed in your desired order. By default, WooCommerce adds the rates in the order they are received. For this plugin to work properly, you can't always place the rates in the order you would prefer. This table will allow you the chance to determine the order the shipping options appear on the cart and checkout pages when this plugin returns more than one.
Settings: Zones
The settings for Table Rate shipping can be found alongside the other shipping methods.
Dashboard: WooCommerce > Settings > Shipping Zones
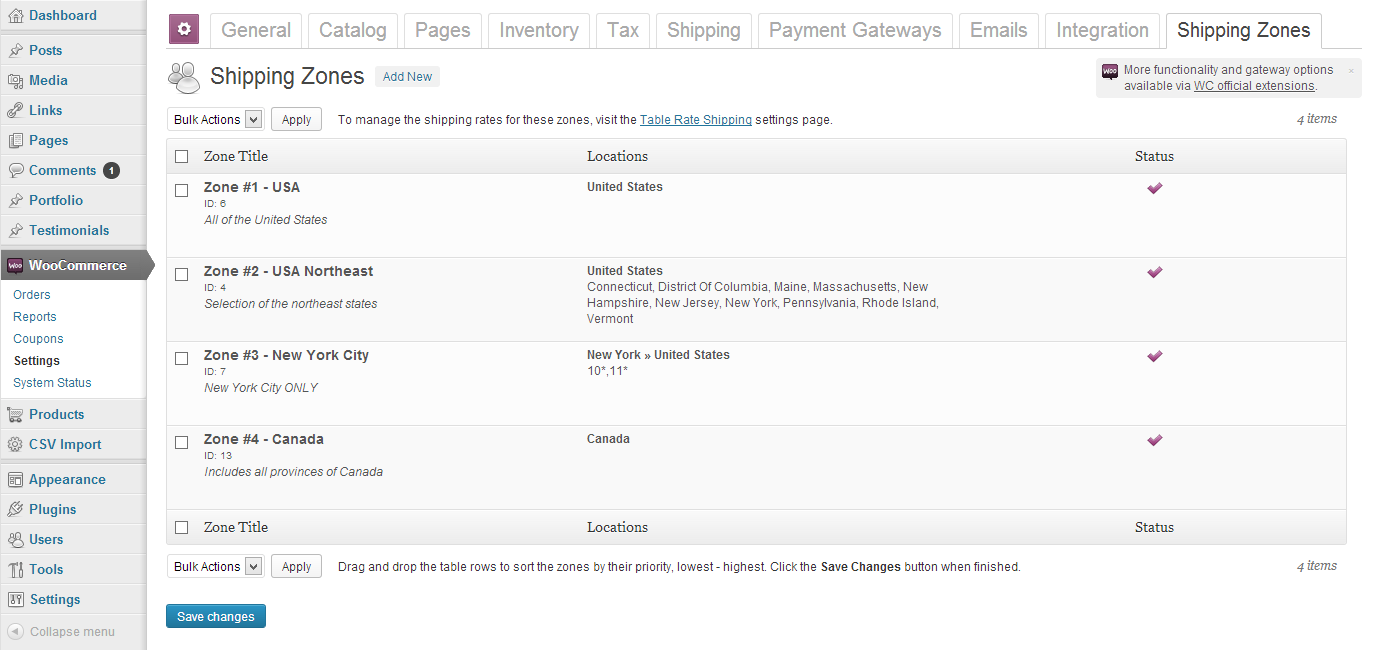
Click the Image Above to View the Full Screenshot
The main page will look very similar to other lists in your dashboard used to maintain the various post types you have. Each row will display information about each zone as described below.
Zone Title - This column will contain the title you assign to your zone as well as it's unique ID numbers and any description you gave to quickly summarize what area the zone covers.
Locations - All specific areas covered by the given zone will be listed here. This could be as simple as 'Everywhere', a specific country or countries, or a list of postal codes accepted.
Status - There will always appear a check mark in this column. If the check mark is purple, then the zone is enabled. If the check mark is gray, then the zone is disabled. To change between states, simply click on the check mark of the zone you wish to enable/disable. You will notice the mark change colors to signal that it was completed successfully.
Re-Ordering Zones
It's important to note that with the addition of zones you are now in control of their priority. This means you must change the order how you wish for rates to be overwritten. Generally this means beginning with 'Everywhere', the lowest priority, and ending with a specific set of post codes, highest priority. This plugin begins with zones top to bottom, comparing their values for the best match. By ordering it this way, a shipping zone will be assigned to 'Everywhere' first, and then look to see if there is a specific country set that the customer is shipping to. If there is, this rate will override the previous one, if not, the user will keep 'Everywhere' as their shipping zone.
To re-order the zones by priority, simply drag and drop each row until you have reached your desire order. Then click the blue 'Save Changes' button below to store your priorities into the settings.
Deleting Zones
From this page you also have the option to delete zones one of two ways. If you're deleting a single zone, it is easiest to hover over the zone you wish to delete. A delete link will appear. Clicking this will then remove the zone from the list. To delete multiple zones at once, check the appropriate box for each zone to be deleted. Above and below the table is a select menu labeled 'Bulk Actions'. Select the option to 'Delete' and click the following button, 'Apply'.
Adding / Editing Zones
To Add a new zone, click the 'Add New' link located next to the headline text 'Shipping Zones' above the zone table. To edit an existing zone, hover your mouse over the zone you need to edit, and click the 'Edit' link that appears. The forms for each of these, described below, are the same.
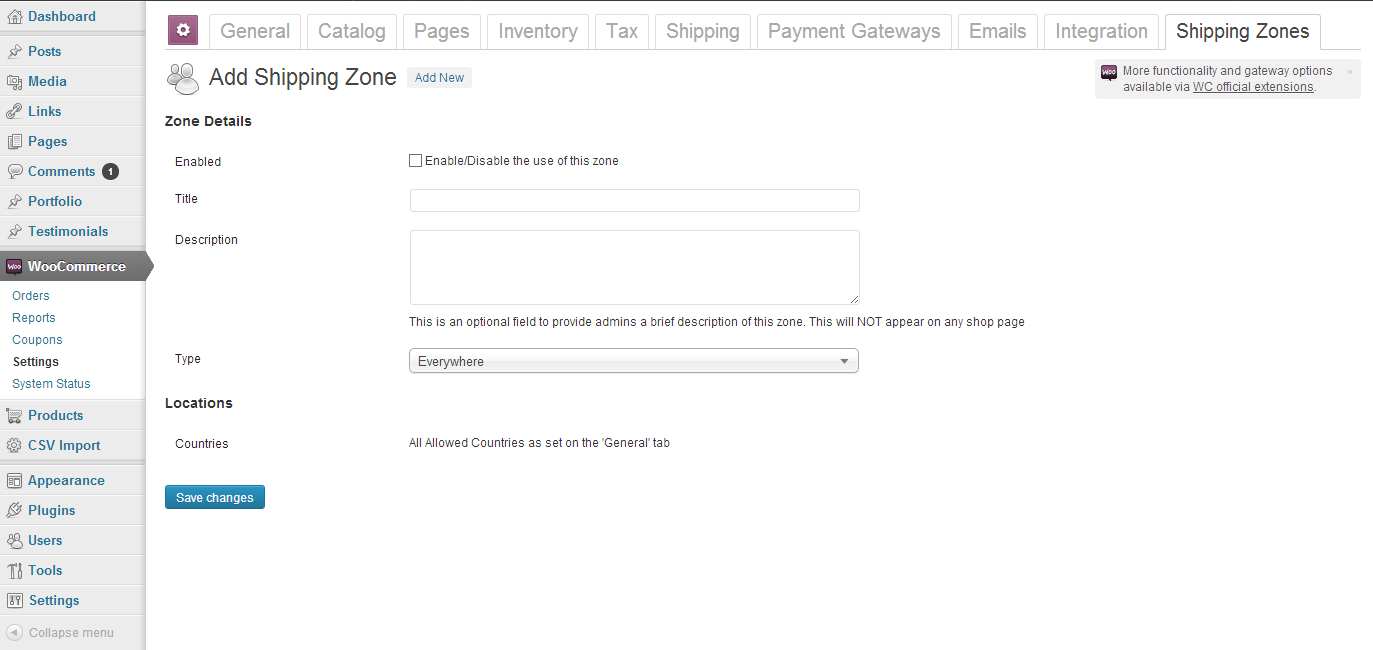
Click the Image Above to View the Full Screenshot
Enabled - This controls whether or not the zone will be active in the table rate settings. When the checkbox is marked, the zone is enabled and active. Unmarking the checkbox will disable the zone from being used but keep your settings saved.
Title - Give your zone a unique name. It will be used in the table rate list to identify which zone is which.
Description - This field is used for administrative purposes only. It will only appear in the general list of zones to provide a brief description if needed. This field is optional.
Type - There are three type of zones: Everywhere, Countries, and Postal Code. See next option for further explanation. 'Countries' 'Postal Code'
Locations - Depending on the option chosen previously, you may see one of three possible views.
Everywhere includes all countries, states, and provinces as defined in the General WooCommerce settings. Therefore no futher settings will be available.
Countries / States allows you to define a specific set of countries and/or states/provinces. A single box will be shown allowing you to select multiple locations in the same manner as other WooCommerce country settings.
Postal Code allows you to choose a single country, state, or province and then list particular postal codes for that zone. Here you can list a specific postal code (i.e. 95348, L0B1B0, FY1 1PT) or use a wildcard asterisk (*) to give a range of postal codes without writing a long list (i.e. 953*, L0B*, FY*). If the postal code is completely numeric, and range operator (-) may be used (i.e. 24352-45123).
Except... - Under the Locations section you will also find one or two more fields that give the ability to not allow certain sections that would otherwise qualify for this zone. If you've selected Everywhere, there will be a multiple country & state select box. The countries chosen here would not qualify as part of 'Everywhere'. If you've chosen Countries / States, two fields are included for exclusion. The first is a multiple select list containing the states for various countries as defined by WooCommerce. The second is a box for postal codes. You can choose to use one or both of these options. The postal code text box will also appear if you have chosen the Postal Code type. All field types follow the same rules as the Location section, except for the exclusion in postal codes (^).
When all settings fields are complete, click the blue 'Save Changes' button to submit your new or edited zone data.
Quick Tips
-
An asterisk (*) is a wild card symbol and the equivalent of all or infinity. When used under a geopgraphic option or shipping class, it denotes that all locations or classes will be included. When used as the maximum price, it states that there is no actual maximum price for this order.
-
Setting the 'min' value to '0' and the 'max' value to '*' means that this particular rate will not be judged on price, weight, or item count.
-
If a customer qualifies for multiple rates in their area, each rate will be added to their shipping options. This is great when setting speed of delivery such as Ground or Express shipping.
-
You may add as many rows to the table as needed. If you are setting multiple rates per customer depending on the country or state/province they live in, the table may grow rather big but it will still function efficiently.
-
Identifiers for each shipping rate do NOT need to be unique, however only one rate for each name will be displayed. For example, if a customer is elidgible for 'Standard Shipping' to the United States for $5.99, and also 'Standard Shipping' to New York, United States for $3.99, only the $3.99 rate will be displayed. This is because New York is a more specific region than United States.
-
You are in control of the order in which zones are calculated. Drag and drop the appropriate rows in your Shipping Zones table and click the blue 'Save Changes' button when finished.
-
Volumetric shipping is completely optional but supported by this plugin. It requires the appropriate divisor set by your shipping company, and the full dimensions for each product you are selling.
-
The DENY option in the cost table removes a rate with the given identifier if it has already been set as a possible rate. Sometimes a shipping model may have a specified rate with one exception such as a certain shipping clause. Perhaps extra large items cannot be shipped overnight. If this is the case, you could set a rate based on cost, but have another row check if their cart has an extra large item. If it does, DENY would remove the overnight shipping option by simply matching the identifiers.
-
Shipping costs can be based on dimensions. Because there is only a single Min and Max value, there can only be one value to compare it to. Therefor, dimensions are calculated as an area. In other words, dimensions are calculate Length x Width x Height. NOTE: If one of these is values is not set, it will be removed from the equation.
- If you need additional tips or support, please try the support forum to see if your question has already been asked by another user.
Sources and Credits
I've used the following resoures to create this plugin.
- WooCommerce Source Code
- WooCommerce plugin and dummy data
Once again, thank you so much for purchasing this plugin. As I said at the beginning, I'd be glad to help you if you have any questions relating to this plugin. No guarantees, but I'll do my best to assist. If you have a more general question relating to the plugins on CodeCanyon, you might consider visiting the forums and asking your question in the "Item Discussion" section.